Wednesday 17 August 2011

Rimmel Lasting Finish Lipstick Swatches

There is a shop in my local town called 'The Original Factory Shop' which is what I would call a 'seconds' shop. This basically means it stocks all the stuff that other shops couldn't sell or items that have been discontinued.

Obviously, the make-up section is my favourite part of the store. It's where I discovered the best top coat ever and is great for stumbling upon products that you've wanted to try in the past but never fancied paying the rrp for.

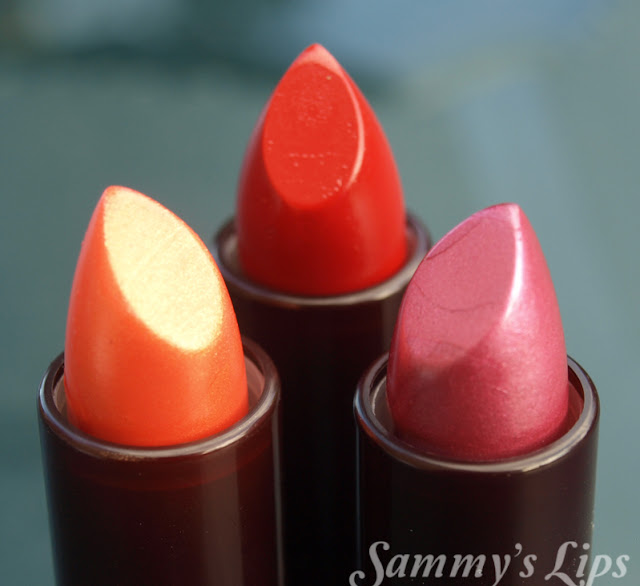
Today, I found some Rimmel lipsticks at just £1 each.  I could have easily taken home one in every colour but had to exercise some willpower and limit myself to 3! The shades I finally decided on are (L-R)
210 Coral In Gold
175 Signature Red
086 Sugar Plum


I was absolutely amazed at the price and the range of shades they had. I've done a bit of research on the web and found that Coral in Gold and Sugar Plum are available in the current range of Lasting Finish lipstick.
It appears that Rimmel have just changed up the packaging and sold off all the old stock to stores like this one.


Coral In Gold is exactly what it says on the lid. It's a coral colour in a base of gold shimmer. The gold is not too visible when it's on the lips. I've been wanting to try a coral lipstick for a long time and at £1, I couldn't really put it off for much longer! I was a bit concerned about it clashing with my orange hair but the two shades compliments each other very nicely.

Sugar Plum is a frosty berry pink. This is a shade I'd be very happy to wear in the day or as part of a party look. Berry pinks always have this great versatility.

Signature Red, wow. I love red lipstick. It's the best way to set yourself apart from the crowd and this one will not disappoint. Not for the wallflowers among us, this will definitely draw some stares!

Monday 25 April 2011

Sucker Punch Inspired: Baby Doll Make-Up

Last week I found myself at the cinema watching Sucker Punch, completely transfixed by the make-up. Forget the stunning visual effects, kick-ass fight scenes and beautiful soundtrack I was so preoccupied staring at the make-up that I missed all the important parts! 
Of the five main characters in the film - Baby Doll, Rocket, Sweet Pea, Blondie and Amber - Baby Doll's was my favourite look so I thought I'd give it a shot myself. 
The film is set in the 60's and the make-up design does a great job of reflecting that. The focus is on Baby Doll's big eyes, using a neutral palette, strong 60's eyeliner and floaty eyelashes. Apparently, they used 3 pairs of eyelashes on set to get her look.


Skin:
I used my regular foundation routine, lots of pink blusher and a bit of E.L.F. All Over Colour Stick in Lilac Petal on the apples of my cheeks as a highlight.

Eyes:
Primark Prime of your Life - In The Pink
E.L.F Brightening Eye Colour - Hazy Hazel
E.L.F Cream Eyeliner - Black
17 Sheer Shine Eye Cream - White
Sleek Original Palette - Gold Shade
Eyelashes from eBay (item)


I noticed that her eyelashes aren't stuck on as close to the lash line as possible, like you would normally wear them. They turn up at the outer corner as if they're following the eyeliner so I tried that on myself and it turned out okay. I think that's the trick to achieving the 'Big Baby Eyes' look, it works as an optical illusion widening your eyes.


I made a little 'map' of the shades that I used and where I used them. As well as these 3 shades, I used a little white in the lower inside corner and a tiny bit of gold spread out under my lower lashline.

Wednesday 16 March 2011

Perfect Girl Eyelashes Review (With Pictures)


Let me just start by saying that I love Perfect Girl eyelashes, so this is less of a review and more me gushing about how amazing they are! 
I can't remember when I got my first pair but it must have been over a year ago and they've been my favourites ever since. It's partly due to the amazingly low price which I find astounding for such great quality lashes. I buy them in Savers for £1.99 a pair but I've seen Superdrug stocking a select few styles for around £4 recently.


The three styles I have at the moment are called (top to bottom) Innocent, Curvy and...... Curvy. I don't know why, but the names on the boxes are the same even though they're obviously very different styles. I even went back in to the store just to double check that one of my pairs didn't come in the wrong box but they were all the same.

The lashes I'm wearing below are the pair in the middle of the above pictures, Curvy. They go from shorter near the inner corner of they eye and fan out nicely to a fluttery outer corner. If you prefer 'symmetrical' styles, there are plenty of those on offer too, but I personally like the ones that are longer on the outer corner.


When I try new eyelashes the first thing I notice is the flexibility of the band that they're attached to. If the band is not very bendy, they're really tricky to apply and you can never get the ends to stick down properly. These lashes all have a great flexy band which makes them easy as pie to apply and they can last all day without peeling off at the edges (which is the most annoying thing ever).


The Perfect Girl range has all kinds of styles, there are dramatic lashes that are perfect for dressing up or light, natural lashes perfect for wearing in the day. Of the styles I've tried, they've all been a dream to put on, they stick to the eyelid great and last all day. If you treat them nicely, they'll give you at least 5 wears and at £1.99, you won't find anything to compete with the quality of these. I recommend getting them from Savers where they're cheaper and there are more styles on offer than in Superdrug (proof). These are the only stores I've found that sell this brand but if you know anywhere else that sells them I'd love to know.

Have you tried these eyelashes? What is your favourite brand/style for falsies?

Sunday 13 March 2011

My Foundation Routine


Despite the fact that I'm turning 20 in less than two weeks, I'm still cursed with teenager's skin. Most of the skin on my face is fine, good even, but it seems that I always have a spotty chin. 
Over the years I've experimented with dozens of foundations and concealers in an effort to cover up my spots but nothing seemed to work. In the past few months, as I've started reading more beauty blogs and extending my make-up know how, I've finally discovered a foundation routine which makes me feel confident about my skin.
You can click on the picture of any product to go to the product site.

1. Moisturise
I know this is basic stuff but it really is essential if you want even coverage on your face. I use Tesco's own Vitamin E moisturiser which is something silly like 78p a bottle. Cheap and effective.


2. Maybelline - Dream Creamy Foundation
I apply this all over my face using the sponge applicator provided. You can already see a reduction in the redness.


3. Vichy Dermablend - Corrective Foundation
I apply this just to problem patches using a brush I got in Primark for £1.50. It's the shape of a foundation brush but slightly smaller at one end and an angled brush at the other. This range is designed to cover any and all imperfections such as vitiligo, acne and scarring so it provides thick coverage. Because of it's heavy texture you only need the smallest amount which spreads a long way. You only need to use it on small areas where blemishes are most obvious. At this stage, most of the redness has disappeared.


3. Jerome Alexander - Italian Marble
This is a mineral foundation which I use all over my face with a medium kabuki for a matte finish. I absolutely love this product. It's long lasting and gives me even coverage. It's perfect for summer when you don't want to wear heavy make-up but still want a generous amount of coverage. When the weather heats up I'll probably just use this over the Vichy.


Do you have similar problems with your skin? What are your Holy Grail products when it comes to covering blemishes?

Wednesday 9 March 2011

Moody Eyes

I was having a bad weekend so on Sunday I really felt like wearing some moody make-up.
All I used to create this look was E.L.F's Cream Eyeliner in Black, Vaseline and a few Q-tips.


I know it doesn't look great close-up but I think the overall effect is moody and brooding, wouldn't you agree?


I applied a thick line of the eyeliner then smudged it over my eyelid using a Q-tip with a tiny amount of Vaseline on. Then I just kept adding more and smudging it around!

Monday 28 February 2011

I'm Sammy and I'm Addicted to Dying my Hair


It's true. I'm a serial hair abuser! I've been quite tame with my hair dying ventures over the last year, keeping it  brown and occasionally popping in some highlights. Last month I decided I wanted to 'ombre' my hair - lightening just the ends of the hair to give the appearance of lots of root regrowth. Then I chickened out because I didn't think it would look good on my mid-length hair, I think it's better suited to longer hair.

By the time I changed my mind, I already had a bleaching kit so I thought I might as well lighten my hair and go light brown for summer. Not all went to plan, but I'm really pleased with the result. Here's the story...


This is the colour that my hair was before I started. This isn't my natural colour, there's about 5 different colours layered on here!


Thursday 24 February 2011

EOTD Help with Hazel

I'm trying to accentuate what little green I have in my eyes and I think this leafy green really does work to bring out the green flecks. I only recently came to the conclusion that my eye colour is in fact hazel and not brown, as I have always thought my whole life! 


I used:
Primark Prime of your Life - In The Pink
MUA Eyshadow - Shade 7
Front Cover Freeze/Sizzle Palette - Toffee
E.L.F Cream Eyeliner - Black